Showing posts with label Natural. Show all posts

Friday, April 26, 2013

Almond Paleo bread, that tastes more like a dessert!

Oh buggar! The first easy Paleo bread I do turns out to be addicting! Almond bread is a nutrient dense bread that tastes more like a coffee cake of sorts. It's didn't help I put some jam on top. I could of ate the whole thing. I am gad they are pretty small. The best part about the almond bread is one slice is VERY satisfying. Although it's scarf-able. I try to stick to one, or have it with a meal. That way I am not tempted to make a meal of it. 

Image

This is a very simple bread. I was searching for a good go to that I can make with few ingredients. I always like a no brainer I can whip up in a pinch. Here I found "Savory Almond Flour Bread" from the Bombshell Blueprint. Maria Guadagno is a Holistic Health Coach, and Raw Food chef in NYC. See her link at the end of the page.

Ingredients
Almond Flour/Meal* (2 1/4 cups)
Ground Flax Seed (1/4 cup)
Salt (1/4 teaspoon)
Baking Soda (1-1/2 tsp.)
Eggs (3 large)
Honey (1 tbs.)
Apple Cider Vinegar (1 tbs.)
Image  
 One tip; make sure your Almond flour has no chunks in it. Almond flour is dense, and can stick together. My loaf came out a little flat. Next time I will run my flour through my coffee grinder. You want a very fine consistency.

Image


Update: I have now done this a few times now. I have found that if you pop the honey and vinegar in the microwave for about 20 seconds it will blend better with the eggs. You really want to whip the eggs in with the honey and ACV too! My last loaf I used my hand mixer to really fluff up the eggs. That way I had more wet ingredient to add to the dry, and it was less dry and lumpy. The difference was night and day! I couldn't believe it was the same recipe
Instructions

1- Preheat oven to 300°F and use grease a  6.5 x 4" pan.

2- Combine the almond flour, flax seed, salt and baking soda in a large bowl.

3- In a separate medium bowl, whisk the eggs, and then add honey and apple cider vinegar.

4- Stir the wet ingredients into dry and mix only until combined.

5- Pour batter into a 6.5" x 4" loaf pan pan and bake for about 25-30 minutes or until a knife comes out clean.


Sunday, April 21, 2013

An Oopsie bread lunch idea.

Image
I have some Oopsie bread left over and I wanted to keep it light today. I also am still running on this low-no and Paleo inspired cooking spree (Oopsie bread goes in the low carb category). So for this lunch inspiration I grabbed a little of every thing from the pantry. Now if you are seriously thinking going Paleo you want every thing to be organic/free range/grass fed. I have to clear out my pantry first before I go shopping again I don't like to waste food. Ask my husband about that, he has to eat all the left overs for his work lunches. Also Fridays will be leftover day, or Sunday afternoon. those tend to be the days I just need a rest!  Myself I have a strange aversion to eating leftovers. Although I know I cooked it, and I enjoyed it (first time around), I just can't do it. My Mum is that way too, strange thing to pass along. 

Oopsie Bread (or for Paleo: Almond) Lunch

1 small can Light tuna, Salmon would be nice.

Jalapeno peppers or green chillies  (or both), as much as you can handle.

Olives (any kind), as many as you want.

Juice from lemon or lime if you are doing the full can  of tuna about 1 Tablespoon

Fresh Cilantro, chopped about 1 Tablespoon

Avocado, 1/2
Combine all ingredients except avocado, and cilantro. 

ImageI smashed my avocado separately because I wanted it more on the chunky side.

Image
Gently mix in you avocado.

Then add your fresh cilantro (yay to my indoor herb garden!)

Image
This was wonderful on Oopsie Bread (try it!), and I can't wait to try it on Almond  Bread. 

Tuesday, March 19, 2013

Protein, Caffeine, and Nectresse, Oh My!

shot_1363704701844


I had forgot I pinned a great breakfast shake, I finally got to make it last week. It's now a morning staple. It's important to get food in your belly with in an hour of waking up. But in my house and many other busy households it can be tough. With in the first 20 minutes of getting up my husband and I are baby wrangling, and convincing a 2 year old to get out of bed. Hubby helps me and gets himself ready, while I fly down stairs and get the kids their juice. Our baby boy is not content until he slams a good 8 ounces of juice. Then it's a battle to find my little girl a breakfast to go. Mean while I am just desperate to get some coffee. But first its get my hubby his caffeine and a breakfast to go thing of sorts because he has his commute and drops of the toddler at play school two days a week! Even after they are all gone I am still feeding my 9 month old boy which is the same size as the 2 year old. The breakfast menu for my baby dude is extensive. Whew.. well if I can shove enough food in front of him, I get a chance to sit and have ... what? Well luckily I found my new staple in the mornings:


Adapted from Fit is the new black.


Ingredients:

♠  2 handfuls of ice

♠ 1 scoop of vanilla or chocolate protein powder. I use a vanilla flavored vegan brand, that has 22 grams of protein per scoop. That’s half of the protein I need for the day!

♠ 1/2 frozen banana

♠ 1 cup of brewed coffee-choose whatever flavor you like

♠ 1 cup of unsweetened almond milk- I like unsweetened almond milk because it’s dairy free, provides extra protein, is creamy, and only 35 calories. However, you can totally use whatever type of milk you want.

♠Nectresse to taste. I actually add it to my coffee like I am going to be drinking it before I add it to the blender. I don't want to over do it! I was originally not using any sweeteners because I have found that they all can be overwhelming and they do not enhance any flavor.

Add all ingredients to blender and go to town! I pour it into a blander bottle because it make a lot and the blender aeration adds to the volume. It is very filling, and I now have breakfast and coffee in a better for me way.

[youtube http://www.youtube.com/watch?v=_Ng5y_XqDNk&w=560&h=315]

Review:

I just started using Nectresse, it is from the makers from Splenda. I will have to say I was slightly weary because I have not been a fan of zero calorie sweeteners unless it was a Stevia type but some times I found even that was too much. I had received my sample in my VOXBOX from Infuenster. After trying it out in my coffee I was surprised. I tasted my coffee, NOT sweetener. I tried it in my tea's which is a tough test to pass. I like a lot of fruit teas, and strong herbal teas and they are best with agave. But sometimes agave or honey can be too sweet, and added calories. Nectresse did the job with out over powering my tea! After all those basic tests I am ready to use in my protein shake.  The best part is that I am also using less sweetener too. You only have to use 1/4 teaspoon for every teaspoon you use! It must be that monk fruit, Nectresse is made with  Monk fruit and 100% natural. I am very happy with the final results, and will continue to use Nectresse.

Influenster Membervoxbox-blogimage-popup2

Monday, March 18, 2013

Better than beach hair; 'Boulder Waves Spray'!

Boulder Waves

Well I had to try it a few times to make sure it wasn't a fluke. But my stick straight hair has been transformed into something amazing. Wavy, and soft.  It's been an incredible, I am truly in shock. It all started with my homemade shampoos and conditioners. Those were fine and dandy, and then I fell for coconut milk. That was better... but had an even better idea! I'm going to to combine the whole kit and caboodle. 
Better than Beach Hair; 'Boulder Waves' ! 
I usually have stick straight hair thats heavy. Not any more!

I stepped out of the shower with wavy hair before the scrunching the scrunching. I had to keep this, I was afraid of loosing the wave.  Because my hair is so thick I was afraid it would dry straight from the weight. I have tried the "beach hair" leave in sprays. Didn't do anything (mainly because I have straight hair) but it was so drying! I had found a couple of popular DIY beach hair sprays, but both had salt, and the other gel! Yuck! I was all dry and sticky. 

After trying my Coconut-poo I was hooked, but it left a heavier feel, so I decided to use a DIY conditioner I was using before and loved to help lighten the feel. The ACV helped break up the heavy and it added the curl without the rubber feel of when I was using it with  my old DIY shampoo. A side note: I had noticed this curling action before using my DIY ACV rinse with a DIY shampoo, but it was so rubbery and too many tangles to let it dry like that. So I had to rake out, but my hair dried soft! The shampoo although used Castile soap like coconut-poo it seemed to have too many rubbery agents! So I kept the ACV rinse for the wave and added the coconut-poo for softness.  How crazy in the natural realm that shampoo and conditioner does each others job?! Then adding my spray for a natural moisturizing hold. BAM BABY! It held for days. At night putting up on top of my head. Then in the morning just a light re-spray with a light scrunch and done! 

So heres my regimine:

Coconut-poo From my earlier post.

ACVConditioner:

 2.5 cups of hot water

 1/2 cup apple cider vinegar (Organic, with the 'mother')

 1/4 sprig of rosemary

 1 bag of your favorite herbal tea, for fragrance

Start by towel drying, using a scrunching method, squeeze hard. But as I scrunched I gently rubbed strands of hair between my fingers. The towel created some friction to make larger waves instead of the scrunched only look. What will totally rock is those towel gloves, saw some at the dollar store;-) There is no need to use a hair dryer, I tend to avoid it. But if you are in a rush use it on warm, low, with a diffuser.  Below is a great example of that fly away, pillow hair I got when I used a warm dryer. When I used the diffuser it gave me this at the roots. LOVED IT!! I also tried using a cold setting, great results too, a lot more smooth. 


*image from imageandstylenews.com

 Use the spray the day after to keep the bump in the hair. The first time I washed I didn't use it. It stayed over night. But the aloe is a great moisturizer and a natural hairspray. But I now use it the same day while scrunching.
Better than beach hair!!! BOULDER WAVES!
I found some nice rough wash cloths to scrunch the hair with.
 They really absorb and create amazing texture.

Boulder Waves Spray

1 cup water , best used filtered, or boil some up if you have hard water!

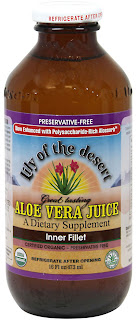
1/2 cup Aloe Juice- a natural conditioner,

1Tbsp Coconut Oil (melted)- provides natural nutrition, great for adding shine, great anti-dandruff benefit, the oils and proteins in coconut oil work well to help keep hair from losing protein, which is one of the major contributors to hair breakage and hair loss 

Water from 1 can of Coconut Milk (Do Not shake can)-great for rehydrating hair, Contains organic compounds possessing growth promoting properties. It's a pain I know, but crack that can open and scoop it out from around the edges of the can. It doesn't have to be perfect. A scant table spoon will do.

5 vitamin E Capsules- promotes growth, decreases sun damage.

2Tbsp Vegetable Glycerin- It has strong humectant properties, meaning it is able to retain moisture, great for dry flaky scalps 

20drps Tea Tree Essential Oil (Optional for oily hair) - This oil moisturizes the hair and minimizes oil production of the scalp, preventing greasy looking hair and leaving the scalp clean and dandruff-free. I used it anyway, it is fresh and good for you. Goes great with the clove.

20drps Thyme Essential Oil- promotes healthy scalps, gives a natural shine, prevents hair loss 

***Update: You can exclude certain oils if you have oily, or thick hair!  The Aloe and glycerine are AMAZING as a humectant. I make sure I always add coconut oil though. Some times I switch it out for the vitamin E. You might feel both oils can be too heavy. But never fear! Work through some baking soda! I tried it, I was a little worried, but it is a cleansing method. I started on my under layers just using my fingers. Cool stuff, and have fun experimenting.

I keep it in a nice misting bottle and the remainder in a jar and fill as I go. I store in a cool place, but I put it in the microwave for about 10 seconds before I use it. You need to re-melt  the coconut oil! Shake before each use.

Now for that sultry, I just hung out at the ski lodge scent in front of the fire:

A few drops of clove. Not as heavy as it seems. Mixed in to the bottle it combines with the tea tree, and thyme beautifully. 

For the romantic Pearl Street Mall Free spirit scent:

A few drops of Rose, and a couple of Patchouli. This will be my next batch.

Boulder Waves 
This was like the 2nd or third day!

So why Boulder hair? Well I am land locked in Colorado! I was thinking about those days snowboarding, my hair getting wet, then drying in the lodge. I would still have it in braided pig tails so I would undo them when I went out for beers on Pearl St. My hair was amazing. I was also in my early 20's. But having those soft waves just reminded me of a day of snow boarding, camp fires, and beers.  Not a day on the beach :-) 

Always buy Organic when possible!


Vitamin E Capsule Conversion

      1 gram = 3/4 teaspoon
      1 capsule (or tablet) = 250 ml
      1 gram = 4 capsules

      1 capsule = 1/4 gram = 3/16 teaspoon
      2 capsules = 1/2 gram = 6/16 or 3/8 teaspoon
      3 capsules = 3/4 gram = 9/16 teaspoon
      4 capsules = 1 gram = 12/16 or 3/4 teaspoon
              1 ounce = 28.35 grams = 21.26 teaspoons = approx 7 tablespoons

Sunday, March 10, 2013

Coconut-poo?!

I'm on a roll like a coconut down a moderately steep but short grassy hill. What!? I don't  get on  much of a roll too often. But like I said previously, I am back on my coconut using and consuming kick again, this time I am adding coconut milk to the mix. I have been making my own shampoo and conditioner, but since I had all this coconut milk I wanted to try some thing else. I also messed up my last batch, possibly put too much oil, or added it twice in the 'poo'. I don't know. So this is a perfect time to try.

Coconut Milk Shampoo 

My hair is in a grow out stage, I am taking biotin, pre-natal, and just about anything else I can find. My hair is growing fast, and oh how the natural red is coming out. I have the most naturally  mashed up hair color. It looks like dark dirty dishwater ash blonde, but that's a cool color right... but with red?! Yeah, awesome, then as it grows out its super blonde at the ends. I have that 'natural-Carrie-"Ombre"-hair'.  But heavy, and stick straight with some odd waves in my under layers where it's the thickest. Did I mention I haven't had it trimmed, and I have some crazy layers from past 'damage control chopping sessions'. With all that said commercial hair products were not fixing any type of damage, wasn't smoothing any hair. I couldn't naturally dry because my layers would just get all wonky.  I have found that natural homemade shampoos and conditioners really lay my hair flat, and seals the hair shaft to produce the shine.  I have been using Bragg's ACV (apple cider vinegar) for conditioner. I don't bother mixing it either I just dump it in, let it sit while I shower and rinse under cooler water (generally as I start to loose my hot water I start to rinse). Works! No it really friggin' works. I read many peoples reactions to this concoction (notes further down about that), and I will add  mine: Not too shabby! You do not need a conditioner after. I am going to try with oil oil, and maybe coconut oil. My thicker hair does feel very heavy and I am not sure if it's the olive oil. The original recipe called for vitamin E, almond, or olive oil. I passed on E because I was thinking it would be even more heavy to mix, and rinse. My top layers are not as smooth as I like as if I used my ACV, so next time I will coco-poo, and ACV rinse!

DIY coconut milk Shampoo/Conditioner 
Oh no! I ran out of liquid soap! I swiped my kids lavender baby shampoo, score! Not what I really wanted to use but its gentle.


Ingredients


1/4 cup coconut milk

1/3 cup liquid castile soap (I used Dr. Bronner's lavendar soap, if you use a bar, grate  use a slow boil, then simmer with your coconut milk to ensure a good mix) or gentle/organic baby shampoo/wash

1 tsp olive oil, Vitamin E, or Almond oil (go with out if you have oily hair)

(10-20 drops essential oil -if you used an unscented soap)

Squirt bottles like a condiment bottle works great. I just reused my empty liquid castile bottle. Shake to blend, and shake before use. Natural ingredients will settle. Remember liquid castile soap does not foam as much as commercial soaps. No chemicals! So I like to section my hair and work each area from scalp to tip adding more if needed. 


So why all the extra 'heads-up' on this one? Well like I said there have been a lot of feed back around the web about a 'detox-period' where your hair will feel waxy but it will pass. But no one has clarified if they were using commercial before or not. My other homemade recipe is also used with liquid castile soap so it must be a coconut milk thing? I am still going to stick with it to use it all up! I am not too bothered about the slight heaviness because it aids as a protectant for when I curl or straighten with an iron. Things to know about any natural DIY shampoo or conditioner is:

  • Don't double the recipe unless you wash everyday (not recommended no matter what you use) because some ingredients require refrigeration.

  • Even after using a ACV(Apple Cider Vinegar) conditioner you won't feel super smooth right away like commercial conditioners (those are the chemicals at work). ACV balances your hair, seals your shaft back to what I call; it's natural normal state.

  • Use a wide tooth comb and fingers, and air dry, or cool dryer. As your hair dries you will start to feel how soft your hair is.

  • Give it time, and make time. The first time devote time to see what your hair does after a natural dry! And your hair needs time to adjust too. 

  • You don't always have to add EO (essential oils). Liquid castile soap smells awesome if you get a scented. 

  • EO is not just for scent, they also have serious function! So unless you know what you need your concoction to do best use scented liquid castile soap or lavender EO.

Here is an EO guide for hair care 

Basil: Oily hair Promotes growth by stimulating circulation Basil
Chamomile: Fine to normal hair Gives golden highlights and sheen Conditions hair Soothes inflamed scalp Helps scaly scalps and psoriasisChamomile
Cedarwood: Normalizes dry and oily scalp Stimulates scalp and hair follicles Used to treat hair loss and dandruff Antiseptic and astringentCedarwood
Clary Sage: All hair types Dandruff treatmentClary Sage
Eucalyptus: Antiseptic Dandruff treatmentEucalyptus
Lavender: All hair types Scalp treatment for itchiness and dandruff Helps balance natural scalp oils Soothes scalp and calms hair Promotes hair growthLavender
Lemon: Oily hair Gives golden highlights Treatment for dry scalp and dandruff Helps balance natural scalp oilsLemons
Lemongrass: Oily hair Slows down scalp oil productionLemongrass
Myrrh: Dry hair Treatment for dry scalp and dandruffMyrrh
Patchouli: Oily hair Dandruff treatmentPatchouli
Peppermint: Dry hair Promotes growth by stimulating circulationPeppermint
Rosemary: Oily hair Dandruff treatment Promotes hair growthRosemary
Sage: Clarifies scalp scalp clarifiers Helps heal scalp problems such as psoriasisSage
Tea Tree: Oily hair Treatment for dry scalp, dandruff and liceTea Tree
Thyme: Antiseptic Stimulates blood flow Invigorates scalp to help with hair lossThyme
Ylang Ylang: Oily hair Antiseptic Dandruff treatment Soothing Stimulates hair growthYlang Ylang
EO guide Source

Saturday, March 9, 2013

I brake for coconuts.

Face and Body wash in ONE!

OK, I know I just posted a ton of new face recipes, but I have been using them for quite some time. It's just  takes THAT long for me to get it up here. So as usual I got distracted by a new ingredient my favorite coconut! It's great for sensitive skin, it will soothe your skin, nourish your skin, and you will feel lovely and soft after. For the first time I made something, and I am typing it up all in the same day! *Shocker, I know!* There was a winter storm warning today so after playing in the snow, cleaning up, I made up my new cleanser and hit the shower. All in the name of beauty science! I really just wanted to say "SCIENCE!"

I was so going to insert Thomas Dolbys' "She blinded me with science" but nooo EMI blocked it in the USA because of copy rights... LAME!! C'mon EMI. So you get this:

You're Welcome

The other day I was at The Dollar Store and they had their coconut milk in stock again. When they have it I clear them out! It's great to make it with pudding, and make chocolate mouse (I will share that nom nom too). I was searching for other things to do with coconut milk and came across just the cutest blog. I didn't bother going any further. I used her recipe, with an addition to an add in ( of course, that's how I roll). I tried it with and with out my add in. It is just a wonderful experience! With a little more research I found the hair recipe which it derived from too. I am doing that tomorrow, hair washing day!
Face & Body Wash

1cup coconut milk or cream (I used canned because it has a thicker consistency)
1/3 cup castile soap (just like the original I started with the lavender)
1 tablespoon coconut oil (unrefined, cold-press organic. You want all the goodness)
1tablespoon olive oil 

*10 drops of tea tree (optional add in for problem skin. Start with 10, increase if you like and know your skin.)

Add to your reusable bottle, and shake! Perfect on a loofa for the body, wonderful on a wash cloth for the face. Finally an all in one, face and body! 
Coconut and Tea Tree oil

Bonus for added moisture and acne fighting :

Melt 1/2 cup of coconut oil, add 10 drops of tea tree oil. Pour into a jar, you can use it as a liquid right away. Then it will harden and use the warmth of your hand to melt again. Make sure you pour it into a wide enough jar to get your fingers in! I used baby food tubs. Perfect! 
Coconut milk  and oil wash for a snowy day. 
After my shower with my new yummies, it was time for a cup of tea.]

Of course by now you know that the super powers coconut oil possesses. A quick rundown just incase.

·       Anti-inflammatory
·       Antimicrobial
·       Antifungal
·       Antiviral
·       Improves nutrient absorption

The uses are endless, the ultimate list I like is here: 

80 Uses for Coconut Oil


Some of my favorite uses for Tea Tree OIl:

Cleaning: 
The non-toxic version of cleaning that is. Add 1 - 2 teaspoons of Tea Tree Oil to 1 - 2 cups of water in a spray bottle to disinfect and clean surfaces. An added bonus is the TTO smells so much better than chemicals.

Acne:
Using a Tea Tree Oil Soap to treat acne has been very effective for many.

Abrasions:
Add 5 drops of Tea Tree Oil to a small bowl of warm water to clean the abrasion. Then add two drops to one tablespoon of Almond Oil and massage the affected area.

Body Odor:
Add several drops to bath water daily to fight off the bacteria causing body odor. Add a few drops to a small amount of baking soda and put in smelly shoes to eliminate nasty odors.


Dry Skin:
Add 6 - 7 drops of Tea Tree Oil per oz. of Almond Oil and apply to skin often.

Flu:
Add ten drops tea tree oil to a warm bath and soak. After dilute five drops tea tree oil in one teaspoon almond oil and massage your whole body. Go to bed and rest.


Heres another list, and another list.


You know me, I just had to drop some natural "SCIENCE"!


Image

Saturday, March 2, 2013

Oh my face!


There are just some times where I feel like my skin is going through its own "thing". As a teen it was my enemy, and to make things worse sensitive English pale skin.  So every thing burns, like water, that burns. I still buy store bought, but never impressed. I don't know if I am just being hopeful, or suckered by advertising. 

I do however always going back to home made remedies
 I have found going natural has calmed and beautified my skin. I now wake up with color in my skin... a good color! Of course I do try to follow the rule of: drink copious amounts of water with lemon. But I needed a topical solution too. So after much searching and studying (while studying to be an aromatherapist) I found some recipes, but also made some of my own.

Lavender

The thing about making your own is that you have to know your oils. I always recommend a good starter oil like lavender. Most commonly know for perfumes, and for tranquility But it goes much deeper than that.

  • Nervous System: Lavender essential oil has a calming scent which makes it an excellent tonic for the nerves. Therefore, it helps in The refreshing aroma removes nervous exhaustion and restlessness and increases mental activity.

  • treating migraines

  • headaches

  •  anxiety

  • depression

  • nervous tension and emotional stress

  • Sleep

  • Pain relief 

  • Urine Flow

  • Respiratory Disorders

  • Hair Care

  • Blood

  • Digestion

There could be more sub categories under those bullet points, but if my writing starts to feel like I am doing a research essay for school... I stop!

The main reason I like to keep lavender around is for the analgesic, anti-inflammatory, antiseptic, anti-fungal, antiviral, antibacterial, diuretic, and sedative properties. Topically used it can treat acne and soothe redness. Sorry, if I got too wordy. I love the study of aromatherapy, and it has really stuck well in the noggin' :-)

 A good beginner face wash is still one I still like to keep around.

]DIY Honey facial Cleanser 
I lucked out on my reusable container, how well does it match!
Homemade Honey Cleanser

3 Tablespoons honey
1/2 cup vegetable glycerine
2 Tablespoons liquid castile soap

DIY honey facial cleanser 

Mix ingredients together. Apply to face and neck and massage into skin for at least 30 seconds, allowing the cleanser to loosen dirt and debris. Rinse face with warm water.


Cherry Mama s Uplifting facial wash


  • 1/4 cup liquid castile soap 

  • 1/4 cup chamomile tea (for its anti-inflammatory properties)

  • 3/4 teaspoon grape seed,

  • 4 drops of Basil an 4 drops of lemongrass (or 8 drops of Lavender)

 Source dreamstimefree_25795

Always shake gently before use. Use with a soft was cloth, gentle motion, do not scrub!

Grape seed oil is known for  anti-inflammatory, anti-oxidant, anti-histamine, anti-aging, anti-allergic, antimicrobial, and adaptogenic activity. It contains 73% of linoleic acid which may be beneficial in the treatment of acne, dermatitis, allergic reactions, atopic eczema and dry and itchy skin. The rich nutrients in Grape Seed extract have been found to protect against UV radiation, and they have been found to lighten the effects on age spots and pigmented skin caused by ultra violet rays.

Basil oil is a very beneficial oil and can be helpful not only for headaches and migraines, but also has an uplifting effect on depression. It enhances the luster of dull looking skin as well as hair. As a result it is extensively used in many skin care supplements that claim to improve the tone of your skin. It is also used for acne and skin infections.

"Lemongrass is pungent and earthy aroma heightens psychic awareness, and purifies the mind." -Source Lemongrass oil helps clear oily skin that is susceptible to acne outbreaks, and acts as an effective skin toner because it naturally dilates the blood vessels, tightens pores and reduces the appearance of wrinkles.


*Cautionary notes: Lemongrass can cause irritation more so than many other oils. It's a strong one! Test your dropper before you add it to any concoction. You want to always make sure your dilution's are exact when using oils topically. As any other beauty product, caution around your eyes too!

Great things to have around 
Great things to have in your kitchen for skin care, and more.

I have also been using natural astringents along side of my cleansing concoctions. Astringents are the easiest to make, and very inexpensive. The one I use daily is a super quick one to mix up. Start with equal parts of Apple Cider Vinegar (ACV), with the "Mother", Lemon juice, and Witch Hazel. ACV forganic and with the "mother" is going to have all the nutrients in it. ACV has become so popular I ingest it, use it on my face, and in my conditioners. ACV is great for your skin because it has antibacterial and antiseptic properties. It balances the PH in your skin, and we all know we need that because beauty product commercials have been drumming that into our head. They are right about that, that's all... ;-) The #1 reccomended vingar is Bragg Organic.  It is the one company that know the benefits of of ACV. I also recently have found it at my local King Soopers (Kroger) for less then some natural stores! WOW! Keep your eye open.
Lemon ACV Witch hazel toner

Next the amzaing lemon, again another one thats great to ingest, with a side of ACV, (more on that another day). The magical lemon in your astringent will brighten your skin,reduce the look scars/age spots, treat acne, and exfoliates. I do have to warn you and this is common sense, use sunscreen, it does exfoliate!

Using a base in you mix ;I do recommend mainly for the added benefits! Witch Hazel rules. Don't get fooled into purchasing a fancy brand. Keep in simple, you will find it in the first aid section just like the glycerin (keep that in mind for later). Witch Hazel will soothe any irritations you have on your skin too. And if your skin is not ready for the full strength mix this will be better to dillute with.

My best mix is 1-1-1, or all equal parts to start with. Although I can handle it straight and I have Brit skin I still like the added benefit.

Refrigerate between use!
Skin brightening toner


ACV and Aspirin toner 
I used Lemongrass because I love it! Just a few drops.
Salicylic Acid (Aspirin), clears away excess oil, cleans out your pores and exfoliates your skin to loosen and help remove dead skin cells)and ACV (note all the good things from above). I keep this one around for break outs, or to treat enlarged pores. These two are drying agents though, keep that in mind, because over drying can cause acne. What doesn't huh! Again, use sparingly if you have normal to dry skin and moisturize. Oily skin, go nuts!

  • 1/2 ounce organic apple cider vinegar

  • 3 ounces mineral water (or distilled water)

  • 5 plain aspirin tablets, uncoated

1. Dilute 1/2 ounce organic apple cider vinegar with 3 ounces water.

2. Use pestle and mortar to crush aspirin tablets. (or use BC powders)

3. Add aspirin tablet mixture to water and vinegar mix.

4. Apply toner sparingly to areas with acne, rough skin or enlarged pores. The solution will stay fresh for one month in the refrigerator.


Tuesday, January 22, 2013

Dawn of a New Budget, Part 4: Bad Ass Balls

Dryer balls are easy, and safe.

Dryer Balls! You know how awesome they are? Well if you don't it's time to find out. They will be the easiest thing to make, and fast too. Except when it jumps out of your hands and a toddler runs off with it... just follow the string. The best part about them is they are re-useable, natural, shorten dryer time, save energy, and don't contain gross things like animal fat like your dryer sheets. All you need is a ball of 100% wool. You can get yourself some at Wal-Mart for about $7. Last few times I was there they were gone, so I went to Michael's, the same thing was over $11! Lame! BUT... I did find some yarn that was 100% wool, and on the front said great for felting. AND... on sale for $4, another bonus I got to choose a color. I chose the ball with all the colors in it. I got about 3 balls out of this, which is perfect because I am adding it to the three I made out of the Fisherman's Wool from Wal-mart. Which by the way will make more, I made some for me and some for my Mom :-)

Image

I love these colors, because it's ALL of them.

First start wrapping it around your two fingers.

Dryer Balls save you energy!

Did my balls my 7 month old son watched Super Why!

Then take off your finger, and wrap it in the middle, now you have a bow tie looking thing.

Dryer balls are easy to make!

Now just go to town start wrapping and it will  build into a ball.

Dryer ball how- toDryer Ball

A good size is about a tennis ball, mine are not all the same at all. They will last you for years, but will decrease in size over time.

Dryer ball

At the end just wrap the end around itself a few times and pull tight, then a small knot. All done, now repeat!  Time to felt.

Just place in size some old nylon panty hose, or a zipper bag. These are great agitators to felt. Toss it in with a load of laundry on HOT. Some yarns felt differently, some do not require hot. I just stick to the hot method just so I know it will get done. Then toss into the dryer with your load, again HOT. Still keep in your hosiery ball, you are still felting. Make sure this load though you do not use a dryer sheet. You do not want that animal fat to transfer on to your lovely natural balls. Once out of the dryer, open up your package and gaze upon your fuzzy balls ;-)

Felting dryer balls

Tie a knot in between each ball too.

The best thing about the dryer balls you can scent one or more with essential oils. I use a lot of tea tree and lavender. Depending on whose load it is. I use 6 balls, and only one scented, thats enough for me. I use about 10 drops on one. You can experiment because it does fade after a few washes. Just make sure you are using 100% essential oils. Now you will have some awesome smelling laundry, with aromatherapy benefits with out the headache of chemicals.

Put your balls to work!