Showing posts with label Inspiration. Show all posts

Saturday, August 3, 2013

One hour Antro Hack, that turned into something better.

This little ditty is about trying something new. Challenging my craft skills, and getting inspired. About taking that moment and giving it a good try! 
 I saw this pin from Anthro. I was like Ugh!  It's just not that cute, too pink ,so overpriced, so mass produced. Not for me my friends. So I was all like, "I can make that." (I know, how random I didn't even like it!) Well maybe, I have never done a jewelry challenge.
 I didn't have everything on hand. And I was not going to buy things for an Anthro 'Inspired' moment. So I dug deep into my pile of crap.( I keep lots of jewelry for their recycling purposes). And I started to pull stuff apart.
Heres what I started with. Didn't have the same, but that doesn't matter, it's an 'inspired' moment.
I ended up going more BoHo with this. Something I would wear!  I was digging around looking for some sort of chord. I found some scraps from my Mens Tee refashion. So cut the strips and braided them. 
There's nothing like an Anthro Hack challenge and beer to create something that you like.  
Go through your old jewelry, break it up. You do not have to be a jewelry maker. 
Just MaCgyver your way through.
OK, now I am warmed up, I can't wait to try this again. 
I have ideas of things to add to this, and I like the t-shirt element.
 Do you do mini challenges to get good at something?
Or, are you just a Rock Star already?

Friday, April 26, 2013

Almond Paleo bread, that tastes more like a dessert!

Oh buggar! The first easy Paleo bread I do turns out to be addicting! Almond bread is a nutrient dense bread that tastes more like a coffee cake of sorts. It's didn't help I put some jam on top. I could of ate the whole thing. I am gad they are pretty small. The best part about the almond bread is one slice is VERY satisfying. Although it's scarf-able. I try to stick to one, or have it with a meal. That way I am not tempted to make a meal of it. 

Image

This is a very simple bread. I was searching for a good go to that I can make with few ingredients. I always like a no brainer I can whip up in a pinch. Here I found "Savory Almond Flour Bread" from the Bombshell Blueprint. Maria Guadagno is a Holistic Health Coach, and Raw Food chef in NYC. See her link at the end of the page.

Ingredients
Almond Flour/Meal* (2 1/4 cups)
Ground Flax Seed (1/4 cup)
Salt (1/4 teaspoon)
Baking Soda (1-1/2 tsp.)
Eggs (3 large)
Honey (1 tbs.)
Apple Cider Vinegar (1 tbs.)
Image  
 One tip; make sure your Almond flour has no chunks in it. Almond flour is dense, and can stick together. My loaf came out a little flat. Next time I will run my flour through my coffee grinder. You want a very fine consistency.

Image


Update: I have now done this a few times now. I have found that if you pop the honey and vinegar in the microwave for about 20 seconds it will blend better with the eggs. You really want to whip the eggs in with the honey and ACV too! My last loaf I used my hand mixer to really fluff up the eggs. That way I had more wet ingredient to add to the dry, and it was less dry and lumpy. The difference was night and day! I couldn't believe it was the same recipe
Instructions

1- Preheat oven to 300°F and use grease a  6.5 x 4" pan.

2- Combine the almond flour, flax seed, salt and baking soda in a large bowl.

3- In a separate medium bowl, whisk the eggs, and then add honey and apple cider vinegar.

4- Stir the wet ingredients into dry and mix only until combined.

5- Pour batter into a 6.5" x 4" loaf pan pan and bake for about 25-30 minutes or until a knife comes out clean.


Tuesday, April 23, 2013

Sesame Tilapia and Miracle Noodle, A zero calorie noodle

I could eat fish daily. And I do, and then I would get sick of it. Thats why I have a big bag of tilapia in my freezer just hanging out.  My recent inspiration part Paleo, part LCHF (low carb high fat), or any version of those has kicked me into gear. This past week I have been experimenting and I have never felt better.

Some times though I need a small cheat. But there's one thing I enjoy is a little research. I came across Miracle Noodle. I have been aware of this product, and have seen a little chatter in forums. Can it be carb free, calorie free? How can a gelatinous noodle be tasty? Well I am on my third bag. I can say I am beyond happy. happy, happy! It's all about the recipe my friends.

I needed to trick my mouth that I was having some sort of carb. I have been very satisfied lately, but I wanted to make an exceptional meal for myself to test my new LCHF muscle. What I have learned and is very much stressed in any of these lifestyles is: no calorie counting, and healthy fats, and protein in every meal. This tilapia dish is my attempt at an Asian inspired dish. My favorite thing about this fish is how it cooks up in the coconut oil. The crispy texture around the edges, and the way it melts in my mouth was just beyond words. Paired with the Miracle Noodle I was left satisfied, not bloated.

PIC_0242

Soy sauce is NOT Paleo, sub with Tamari Gluten Free Soy Sauce or Coconut Aminos. You can also try Braggs Liquid Aminos. Here's a good page about that:  Big Red Kitchen

PIC_0244

Melt your coconut oil, remember unrefined, virgin is always best. I used a healthy tablespoon for my two filets.

PIC_0245

Sprinkle a layer of toasted sesame seeds evenly over your melted oil.

PIC_0247

Place your filets in gently. Cook over medium heat. You want to do the majority of the cooking on one side on medium heat. Not too high, the pan will spit at you! Make sure you have enough oil that it bubbles all around the edges. This will make that amazing crispy texture.

While they are cooking add your chopped garlic. 

PIC_0248

Spread your garlic around. Again leave your fish on one side for about 8 minutes or you see the light brown crispiness forming on the uncooked side around the edge. You want it cooked most of the way through. Because when you flip to do the final side you do not want to burn the garlic. While all this is going on cook your broccoli, you will be tossing it in when it done.

PIC_0255

Now flip! Your filets should be beautifully browned, and nice and crispy around the edges. You only need a few minutes to finish of the other side. Keep an eye on it. Burned garlic isn't to pleasurable. 

PIC_0251

In the few minutes you have get your Miracle Noodle ready. Rise, drain , pat dry.

PIC_0258

Really shake them out, make sure there is no stuck together clumps. I know it looks like jelly fish tentacles. But they cook up amazing!

Remove your fish and set aside, now toss noodles into the same pan.

PIC_0263

Add your soy sauce. For this portion I stuck with the serving size from the bottle which was a table spoon. It was perfect. Really stir it around, make sure you absorb as much of the oils, and sesame seeds. These noodles cook in minutes. They will become more solid; not just a limp wet noodle any more! Remove and set aside.

PIC_0265

Add your cooked broccoli. Again you are stirring them around to pick up oils, and sesame seeds.

PIC_0267

This was probably the most satisfying lunch! It will make an appearance for dinner for sure.

I was so full and satisfied. If you are calorie counting you're looking at:

100 cals per filet

120 cals, tablespoon of oil (good fats)

Zero cals Miracle Noodle

31 cals in one cup of broccoli 

Look what came today!!!! Yes that's 'Rice' and a 'Fettucini' noodle! :-)

PIC_0280


Saturday, March 30, 2013

One seam PJ's and a use for old bed sheets, a Camera phone tutorial!

Only I can take the easiest PJ tutorial, and find a short cut. But I personally am proud because I am calling it a repurpose (sneaky cheat move).

I have accidently held on to some bed sheets that just don't fit any of the beds in the house, and my eldest daughter has grown out of a set too. I also didn't want to spend any money on making PJ's pants. I had some old Nightmare before Christmas sheets and I knew I had to use them for something. I was also hanging on to a link for a 'one seam PJ tutorial' link off Pinterest. I had to give the tutorial a try before I moved to the sheets. I used some remnants I had to make my son some. He was in a growth spurt so I had to make some things to hang out in the house. Because I would be washing the few pair of nice pants constantly (he is the spit up King). They were easy to whip up. After that I was hooked! Holla! <---Said that!

The tutorial calls for a cute cuff that you can make in different but coordinated fabric. I was like, “Nuh-uuuhh, this is supposed to be The Lazy Mama's tutorial!”. Then I was like, '”Ah-ha!”. You know why? Your old flat sheets and pillow cases already come with a ready made hem, and cuff. And if you have an older nicer flat sheet might have that ribbon detail! There you go I just Lazy-ified easy! I mean I got crafty on crafty!


Lay out your fabric, or flat sheet. You will be tracing plus a bit (seam), around a pair of pants, or other PJ's. 

Fold your fabric lengthwise, this will create your first leg, and one less seam! Pa-pow!

easy one seam, ready made cuff PJ tutorial
At this moment I realized I am wearing the pants I want to trace... so it is now a, 'ass out' tutorial!

Fold your pants in half and trace and cut. You now have your pattern, use the one you have just cut, and trace again on another folded area of your fabric.

Image

Easy! Make your own PJ pattern.
When I am winging it making my own pattern I do take a moment to pin it the two legs on top of each other just to trip up and make sure it's not all out of whack!

Now you should have two legs! Open them up, sew just the crotch on either side.

easy PJ tutorial
Open them up! Then stack them.

Easy PJ tutorial
When they the two legs are on top of each other make sure they are inside out! Because next you will start to sew.

Easy PJ tuutorial
The pins mark where you will be sewing

Easy PJ tutorial
Pins show where you will be sewing first. Remember you are only sewing the rise first.

Now fold them back so you are looking at the front of them, you now have PJ chaps! Just sew the inseam of each leg. Remember you already have your bottom seams done :-)

Easy PJ tutorial
By now you are on the radar of your kids, they will be such great helpers (ahhhh!). There ya go, the rise (crotch) sewn, and folded back to look like pants.

To make a waist band, simply fold over the width of your elastic with a little room for your seam. Too much you risk rolling elastic, to tight, well your elastic just won't fit :-) Sew all the way around leaving about an inch to feed your (measured to your PJ recipients waist) elastic through by using a safety pin.

Easy PJ tutorial
Measure your waist band.

Easy PJ tutorial
Sew around creating a waist band, leave room though! You have to thread your elastic.

Easy PJ tutorial
Sew your elastic together, before you sew up the opening.

When all the way through sew your elastic together, then sew up your hole.


DONE!

Easy PJ tutorial!
Then I ran downstairs to my daughters room, only full length mirror with space. Love the haze? The toddler happened all over it! HA!Easy PJ tutorial

To see more pictures, or the tutorial with the cuff go HERE.

Monday, March 18, 2013

Better than beach hair; 'Boulder Waves Spray'!

Boulder Waves

Well I had to try it a few times to make sure it wasn't a fluke. But my stick straight hair has been transformed into something amazing. Wavy, and soft.  It's been an incredible, I am truly in shock. It all started with my homemade shampoos and conditioners. Those were fine and dandy, and then I fell for coconut milk. That was better... but had an even better idea! I'm going to to combine the whole kit and caboodle. 
Better than Beach Hair; 'Boulder Waves' ! 
I usually have stick straight hair thats heavy. Not any more!

I stepped out of the shower with wavy hair before the scrunching the scrunching. I had to keep this, I was afraid of loosing the wave.  Because my hair is so thick I was afraid it would dry straight from the weight. I have tried the "beach hair" leave in sprays. Didn't do anything (mainly because I have straight hair) but it was so drying! I had found a couple of popular DIY beach hair sprays, but both had salt, and the other gel! Yuck! I was all dry and sticky. 

After trying my Coconut-poo I was hooked, but it left a heavier feel, so I decided to use a DIY conditioner I was using before and loved to help lighten the feel. The ACV helped break up the heavy and it added the curl without the rubber feel of when I was using it with  my old DIY shampoo. A side note: I had noticed this curling action before using my DIY ACV rinse with a DIY shampoo, but it was so rubbery and too many tangles to let it dry like that. So I had to rake out, but my hair dried soft! The shampoo although used Castile soap like coconut-poo it seemed to have too many rubbery agents! So I kept the ACV rinse for the wave and added the coconut-poo for softness.  How crazy in the natural realm that shampoo and conditioner does each others job?! Then adding my spray for a natural moisturizing hold. BAM BABY! It held for days. At night putting up on top of my head. Then in the morning just a light re-spray with a light scrunch and done! 

So heres my regimine:

Coconut-poo From my earlier post.

ACVConditioner:

 2.5 cups of hot water

 1/2 cup apple cider vinegar (Organic, with the 'mother')

 1/4 sprig of rosemary

 1 bag of your favorite herbal tea, for fragrance

Start by towel drying, using a scrunching method, squeeze hard. But as I scrunched I gently rubbed strands of hair between my fingers. The towel created some friction to make larger waves instead of the scrunched only look. What will totally rock is those towel gloves, saw some at the dollar store;-) There is no need to use a hair dryer, I tend to avoid it. But if you are in a rush use it on warm, low, with a diffuser.  Below is a great example of that fly away, pillow hair I got when I used a warm dryer. When I used the diffuser it gave me this at the roots. LOVED IT!! I also tried using a cold setting, great results too, a lot more smooth. 
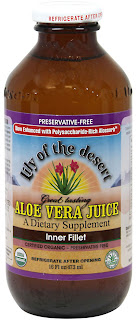

*image from imageandstylenews.com

 Use the spray the day after to keep the bump in the hair. The first time I washed I didn't use it. It stayed over night. But the aloe is a great moisturizer and a natural hairspray. But I now use it the same day while scrunching.
Better than beach hair!!! BOULDER WAVES!
I found some nice rough wash cloths to scrunch the hair with.
 They really absorb and create amazing texture.

Boulder Waves Spray

1 cup water , best used filtered, or boil some up if you have hard water!

1/2 cup Aloe Juice- a natural conditioner,

1Tbsp Coconut Oil (melted)- provides natural nutrition, great for adding shine, great anti-dandruff benefit, the oils and proteins in coconut oil work well to help keep hair from losing protein, which is one of the major contributors to hair breakage and hair loss 

Water from 1 can of Coconut Milk (Do Not shake can)-great for rehydrating hair, Contains organic compounds possessing growth promoting properties. It's a pain I know, but crack that can open and scoop it out from around the edges of the can. It doesn't have to be perfect. A scant table spoon will do.

5 vitamin E Capsules- promotes growth, decreases sun damage.

2Tbsp Vegetable Glycerin- It has strong humectant properties, meaning it is able to retain moisture, great for dry flaky scalps 

20drps Tea Tree Essential Oil (Optional for oily hair) - This oil moisturizes the hair and minimizes oil production of the scalp, preventing greasy looking hair and leaving the scalp clean and dandruff-free. I used it anyway, it is fresh and good for you. Goes great with the clove.

20drps Thyme Essential Oil- promotes healthy scalps, gives a natural shine, prevents hair loss 

***Update: You can exclude certain oils if you have oily, or thick hair!  The Aloe and glycerine are AMAZING as a humectant. I make sure I always add coconut oil though. Some times I switch it out for the vitamin E. You might feel both oils can be too heavy. But never fear! Work through some baking soda! I tried it, I was a little worried, but it is a cleansing method. I started on my under layers just using my fingers. Cool stuff, and have fun experimenting.

I keep it in a nice misting bottle and the remainder in a jar and fill as I go. I store in a cool place, but I put it in the microwave for about 10 seconds before I use it. You need to re-melt  the coconut oil! Shake before each use.

Now for that sultry, I just hung out at the ski lodge scent in front of the fire:

A few drops of clove. Not as heavy as it seems. Mixed in to the bottle it combines with the tea tree, and thyme beautifully. 

For the romantic Pearl Street Mall Free spirit scent:

A few drops of Rose, and a couple of Patchouli. This will be my next batch.

Boulder Waves 
This was like the 2nd or third day!

So why Boulder hair? Well I am land locked in Colorado! I was thinking about those days snowboarding, my hair getting wet, then drying in the lodge. I would still have it in braided pig tails so I would undo them when I went out for beers on Pearl St. My hair was amazing. I was also in my early 20's. But having those soft waves just reminded me of a day of snow boarding, camp fires, and beers.  Not a day on the beach :-) 

Always buy Organic when possible!


Vitamin E Capsule Conversion

      1 gram = 3/4 teaspoon
      1 capsule (or tablet) = 250 ml
      1 gram = 4 capsules

      1 capsule = 1/4 gram = 3/16 teaspoon
      2 capsules = 1/2 gram = 6/16 or 3/8 teaspoon
      3 capsules = 3/4 gram = 9/16 teaspoon
      4 capsules = 1 gram = 12/16 or 3/4 teaspoon
              1 ounce = 28.35 grams = 21.26 teaspoons = approx 7 tablespoons

Monday, January 28, 2013

Sexy Chicken! You dirty bird. And getting ready for the week!


I know, that was foul. Yeah, I went there. 

Every Sunday I prepare for the week. I like to get a whole chicken in the oven or crock, and bread made for the week. My husbands lunch staple it a rotisserie chicken sandwich. All home-made of course, along with his granola bar, and some other baked goodie. It seems a lot to do, but bread is super easy when you are using my quick bread, and in oven rotisserie.

It's all in the timing. I like to get the chicken in  first thing in the morning. That way it's said and done, and if I don't cook another thing all day... there's dinner done too!

 So you wonder why I call it Sexy chicken... well it's mainly how he went into the oven. I decided to remove all the skin for the hubby so I can get it super crispy all the way around.  Well, after I skinned the thing Mr. Chicken was a bit all over the place. Every time I put him in his pan his legs would flop open and over the sides. I didn't have any roasting tie to bind the legs and arms, but that's OK, it would have been a little too Shades Of Grey. There was still a lot of poking and rubbing to come. So the only way I could contain him  was pose him seductively like a man on a bear skin rug. Or Stan Lee on a couch. 


There you go. Stan Lee on  couch.
There you go. Stan Lee on couch.

There you go. Sexy Chicken.
It was a risk taking the skin off because you do run the risk of it being slightly drier. But the rotisserie rub created an all around crispy shell. Pretty cool. I prefer the skin on for a more sticky rotisserie taste.

Original recipe makes 2 whole (4 pound) chickens

Sticky Rotisserie Chicken

  • 4 teaspoons salt

  • 2 teaspoons paprika

  • 1 teaspoon onion powder

  • 1 teaspoon dried thyme

  • 1 teaspoon white pepper

  • 1/2 teaspoon cayenne pepper

  • 1/2 teaspoon black pepper

  • 1/2 teaspoon garlic powder

  • 2 onions, quartered

  • 2 (4 pound) whole chickens

Mix all your spices in a small bowl to make the rub. Wash and pat dry your chicken. Stuff your onions in the body cavity. Rub mix over entire body. Not you the chicken.  Place in roasting pan, bake at 250 degrees for 5 hours uncovered.

*Tip: The local grocery store actual prepares their chicken 24 hours ahead! Rub your mix on your chickens and place in an air tight plastic container over night in the refrigerator. The spices react with the skin to really create that super stickiness! *NOM NOM* 

Chikka- chicka bow bow...
If you did your chicken in the morning, you now have the afternoon to play,  make bread and treats.

The 'go to' bread I make is so diverse. It can be used for rolls and pizza dough :-) I use half of this recipe to make 2 pizzas. But to do sandwich rolls and pizza use full amounts.


  • 2 ½ C warm water

  • 6 Tbsp sugar

  • 3 Tbsp yeast

  • 2 Tbsp oil

  • 6 C flour (can use white or whole wheal)

  • 2 tsp salt

  • 1 tsp baking powder

Stir water, yeast, sugar and oil together. Leave for 5 minutes until it becomes frothy on top. Add flour, salt and baking powder. Mix well. Knead. Roll out if making a pizza base or shape for use as buns / bread / loaf. Bake at 350 degrees for 10-15 minutes. Keep your eye on it, times will differ for rolls and pizza dough. My pizza base took about 15 minutes. If you are making bread or rolls paint the tops with butter when they come out of the oven, delish!

Before it went into the oven I rubbed them down with chopped garlic.

The pizza bases came out so puffy, and the garlic looked delish! I am thinking Naan Bread!!!!

Quick bread pizza
All done! I had a white pizza with chicken, and the hubby had a traditional pepperoni pizza.

Now you have had your lunch. *NOM NOM* If you are not in a coma, or have made a mess by now time to kick out the granola bars. A favorite in our house. I bought a dented can of pumpkin awhile back for 64 cents.  I figured now would be a great time to try it! I have never used canned pumpkin, or tasted, and I hate pumpkin pie. But pumpkin spice lattes are my crack... I know I'm an odd cookie huh? So searching around I found a few recipes, so as usual I smashed them all together to make this:


The are so fun to wrap up in wax paper to add to lunches.

  • 2 cups old-fashioned oats

  • 1 tsp. cinnamon

  • 1-1/2 tsp. pumpkin pie spice

  • 1/4 tsp. salt

  • 2/3 cup pumpkin puree

  • 1/3 cup agave nectar

  • 3 tbsp. maple syrup (I did not have so I used some more agave, and added a tsp. of maple extract.)

  • 1 tsp. vanilla

  • 1/3 cup almonds, roughly chopped (I don't use nuts because I feed these to young ones)

  • 1/3 chocolate chips, Dark chocolate is a wonderful complement

  • 1/3 cup dried cranberries

I like to mix all my ingredients together BEFORE I add oats, nuts, chocolate, and cranberries. I like to use the whisk attachment on my mixer first. Really whip it up so it's blended and you have a nice glue for your bars! I change to the paddle attachment and fold in the oats, I do it slowly because I don't want my oats pulverized. Then slowly fold in your mix-in's . If you like your bars loaded with everything keep an eye on the mixture. Too dry and they wont stay as a bar. You can drizzle in more agave if needed.  Press into a greased baking pan, or glass dish. Bake at 350 for 15-20 minutes, until you have a golden crisp around the edges.  Let cool thoroughly then slice up in the pan, or flip onto the counter. I used a pizza slicer, works like a dream to cut!
Enjoy, you have goodies done for the week.♥


Wednesday, January 23, 2013

Damn You Nutella!

Damn you Nutella! Not cool! Why is there not a warning on you, why didn't some one warn me. Why isn't the FDA putting warnings on this. Is the cashier @Kroger negligent for my sugar induced coma. Will they pay for my rehab. I love hazelnuts, how dare you trick me.


Image

I had to write this down quick all this has just derailed me. I was at the store picking up organic juices, and good things. I saw Kroger does their own Nutella yay! Now I can try it, maybe get my toddler to eat it on bananas. Well of course she will, it's crack!! We got home and smeared some on a banana. Went over nicely, all over the face, hair, arms, and now my two year old is hopped up before nap time. Greeaaaaaaaat. There was no nap that day.


Image

Well stupid me, I did it again, thought I'd treat my toddler to having some pretzels dipped in Nutella... *sigh*. I am such a Nutella newb. Some how it exploded, and I am not talking about the kid. I had it down my shirt, and its on the lap top... I just .. I just can't remember what happened. I think I blacked out and went into Nutella shock. 

So now I must do good... I must use it in a recipe. Then it will be gone! You know whats funny.. after I came out of my coma I googled: Damn you Nutella. Good times, I am glad I am not alone.

There were a lot Nutella brownies, and butter cream  all this will not be helping my sugar shock. So I have taken something as EVIL as Nutella and made it nice again. Well long enough to use it, and get it out of your home:-)

Nutella Hot CocoaThis is the easiest recipe to do. I would replace the milk, use Soy, or almond, unsweetened, just to balance out the sweet.

Use a light whip, or soy whip. 

And marshmallows optional. But after comparing, marshmallows they seem more innocent now ;-)

My next adaption is of course make a granola bar! I am going to use one of my base recipes, and add Nutella, and flax seed to make my conscience lighter.

[caption id="" align="aligncenter" width="487"]Nutella Bars Perfectly NOT sugary! A great balance, and NOM NOM![/caption]

Here is my  recipe, along with options and mix in's:

  • 2 cups old fashioned oat

  • 1 3/4 cups of puffed BROWN rice (or just use 3 3/4 Cups of oats)

  • 1/2 cup ground flax*

  • 1 tsp of Cinnamon

  • 1/2 cup wheat flour

  • 1/2 tsp baking powder

  • 2 large bananas (Use ones that are still a bit green, the starch hasn't turned to sugar yet)

  • 1/4 Nutella, or store brand version

  • 1/4 Agave light nectar* ( or honey, or maple syrup)

  • 1tsp of Almond extract*

  • 1/2 tsp of Vanilla*

  • 1/4 tsp salt

  • 1 cup of banana chips lightly smashed

  • 1/2 cup of dried cranberries*


Mix your dry ingredients, set aside. In a small pan melt your smashed bananas, agave, extracts and Nutella. Use medium low you don't want to burn your mixture. After a minute of a low simmer pour over your dry mixture. Use your mixer on low ( or fold in with spoon) until mixed.  Press into a greased pan of choice. Depending on how thick or thin you want them. Bake on 350 for 20-25 minute depending on thickness.  I did 9x9 glass, and it took 25 minutes, I am also in Colorado high and dry altitude cooking. You just want it slightly browned.  Let cool thoroughly. If you get the urge to flip it, wait 10 more minutes. Thats what my husband says. I have a bad habit of not wanting to wait and I flip the pan onto the rack causing my bars to break. It's a cheap excuse to just eat them.

* there's a lot of stars there for a reason. This recipe is so interchangeable depending on how sweet you want it.  Like I said I just came out of a guilty Nutella coma and had to rectify the situation! You can substitute any of your agave nectar for maple syrup, or honey, or use agave with maple extract instead of almond extract. You can use Vanilla extract only, or add it with maple. It's all yummy. I used almond because I just didn't want the sweet, and  used 1/2 of vanilla, I almost wished I did 1/2 of maple, next time! I also starred flax seed, you can also change this to the new super Chia Seed! Flax does add fat, but still amazing for you. It depends where you want to take it!  You can switch out cranberries for chocolate chips or any kind of nut. I just used what I had on hand. Go "nut's" :-)

For quick snacks you can use your banana chips and dunk in Nutella, place on parchment paper and let set in the refrigerator. It also works with just about everything. Avoid shoes, Cheetos, and already fudge covered cookies, I just don't recommend them no matter how bad you need a sugar rush! I will also be dunking lemon cookies, cinnamon graham crackers and pretzels. That way my toddler cant just suck it all off. 

I was hoping to find a support group, instead I get a Fan Club... No No No... that will not help!

Nutella Fan Club


[caption id="" align="aligncenter" width="292"] This guy angered the Nutella nation... probably the best thing you could do with it :-)[/caption]